
By: Andrew
This document is for people who want to set up the Gamecube version of Phantasy Star Online to play on their LAN. I assume that you have a clue what a Gamecube is and what Phantasy Star Online is. I also assume that you have a LAN allready set up, own a copy of PSO, a Gamecube, a broadband adaptor and I assume that a computer is set up on your LAN. I am writing this manual in detail so that anyone can get this to work.
Step 1:
Install the broadband adaptor on your gamecube if you haven't allready done so. If you need help on installing the broadband adaptor please see the instruction manual that came with the adaptor. Next start up Phantasy Star online. When the main menu appears after you press start press down until you are are on the options choise and press the A button.
Step 2:
On the new menu that has appeared click A on Network Option and then click A on Provided Option. Now go up to yes and press A. If you have allready created a provider press Yes on the dialog box that asks you if you wan't to use the network configuration file in the Slot A. Otherwise you need to jusk make one for the saver in slot A.
Step 3:
Click A on Network Setup. On the list that has come up pick a new provider if you have allready created the configuration for your provider. Other wise click on Edit Menu. Name your ISP using the box that has appeared with the name preentered as provider 4 and rename it as LAN. Click Next. Click A on the radial buttons that say Do not automaticly disconnect and Manually set IP address. Click Next.
Step 4:
Set the following fields appropitly to match these ones: IP address: 192.168.0.50 Subnet Mask: 255.255.255.0 Default Gateway: 192.168.0.2 Primary DNS: 192.168.0.2 Secondary DNS should be left blank. Click A on next. Again press A on next. Finally Press A on save. Click A on back after it has finished saving. Press A on Return to game and press A on yes.
I haven't done this in a while... So I may have a problem with the additional gamecube part let me know if im wrong
For additional gamecubes you only need to change the IP address by adding one for each additional one.
Example:Cube two's network settings
IP address: 192.168.0.51 Subnet Mask: 255.255.255.0 Default Gateway: 192.168.0.2 Primary DNS: 192.168.0.2
Congradulations,
your gamecube is now set up. Next you need to set up your computer to act as the server.
Server Setup
Step 1:
Download the LAN Server software for the PC version of Phantasy Star Online. You can download it from here or from its original site. The Phantasy Star Online Personal LAN Server's home page.
http://schtserv.funurl.com/
The newest verson does not work so use the older version. This server software works because the PC version was the precursor to the gamecube version and because it is very similar in it's programing.
Step 2:
This is the hard part because you will need to know a little about your DNS server if you don't have the versions that I have explanations about below.
Windows 2000 Server
Please check these steps because right now I am unable to check that they are exactly correct.
Go to Start, Settings, and click on control panel. Double click on network. Scroll down to the protocal entitled TCP/IP and change the settings. Make sure that the address is staticly set to 192.168.0.2 and the subnet mask is set to 255.255.255.0. Apply changes and close the network config application. Restart if necesary.
This is an easy setup because of the graphical menus that will help you set it up.
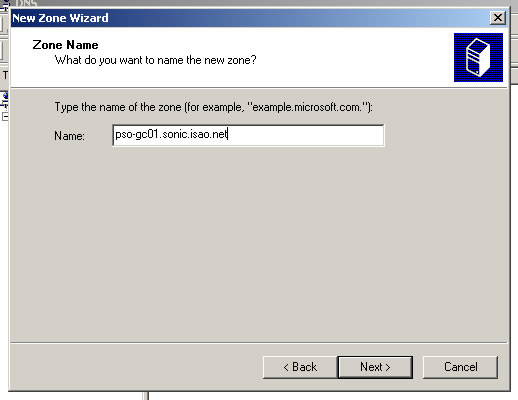
pso-gc01.sonic.isao.net
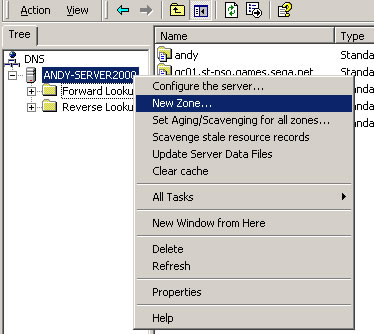
First point to Administrative Tools and then click on DNS.

Highlight your server's name and right click it and release on New Zone.
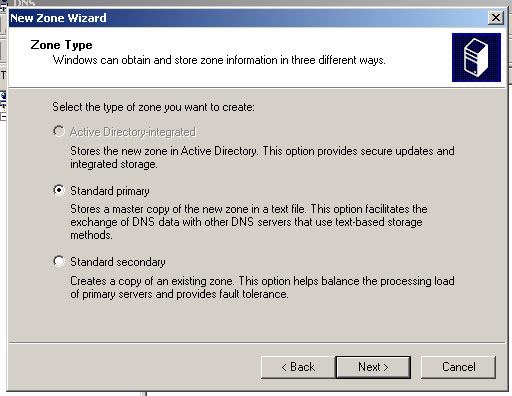
Click Standard primary click next,
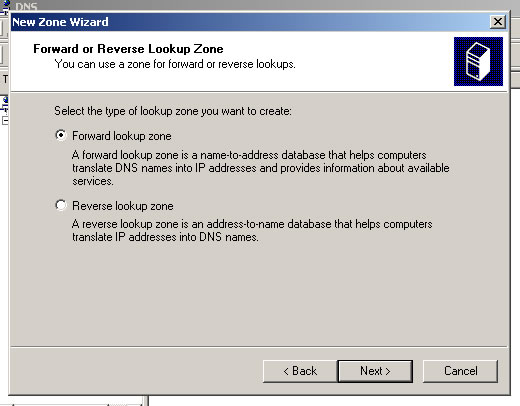
then Forward Lookup Zone
and name it pso-gc01.sonic.isao.net.
Accept defaults untill you press finish. Right click on the new zone and click add new host.
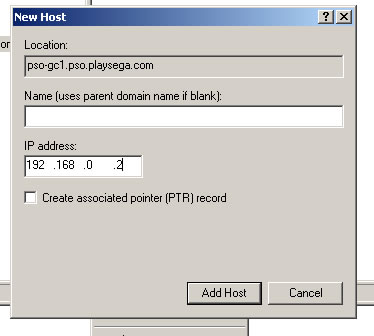
On the box that appears type the IP address as 192.168.0.2 and close the box saving changes.
gc01.st-pso.games.sega.net
Highlight your server's name and right click it and release on New Zone. Click Standard primary Forward zone and name it gc01.st-pso.games.sega.net. Right click on the new zone and click add new host. On the box that appears type the IP address as 192.168.0.2 and close the box saving changes.
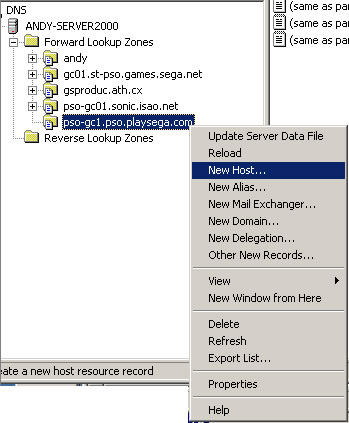
pso-gc1.pso.playsega.com
Highlight your server's name and right click it and release on New Zone. Click Standard primary Forward zone and name it pso-gc1.pso.playsega.com. Right click on the new zone and click add new host. On the box that appears type the IP address as 192.168.0.2 and close the box saving changes. Save all changes and restart the DNS Server. Run the config ship program with the following values: IP 192.168.0.1 and server name LAN. Run the server software.
Red Hat Linux 9
Note: You must be logged in as the user root or have the root password to be able to set this up.
Click on the Red Hat and hover your mouse over System Settings and then server settings. Click on Services. Scroll down to named and check the box. Press Start and hit ok. Click on file and then on save changes. Close the services program.
Click on the Red Hat and hover your mouse over System Settings and then server settings. Click on Domain Name Service.
Click New. On the field that appears type isao.net and hit ok. Where it says Primary name server type "192.168.0.2." You need the period. Under Records click on isao.net and press edit. Press add and type 192.168.0.2. Press ok. Again press ok. Press add and type pso-gc01.sonic and where it says address type 192.168.0.1. Press OK. Press add again and click on the tap named name server and under domain name type pso-gc01.sonic. Under server by type 192.168.0.2. Press OK. Again Press OK.
Click New. On the field that appears type sega.net and hit ok. Where it says Primary name server type "192.168.0.2." You need the period. Under Records click on isao.net and press edit. Press add and type 192.168.0.2. Press ok. Again press ok. Press add and type pso-gc01.sonic and where it says address type 192.168.0.1. Press OK. Press add again and click on the tap named name server and under domain name type gc01.st-pso.games. Under server by type 192.168.0.2. Press OK. Again Press OK.
Click New. On the field that appears type playsega.com and hit ok. Where it says Primary name server type "192.168.0.2." You need the period. Under Records click on isao.net and press edit. Press add and type 192.168.0.2. Press ok. Again press ok. Press add and type pso-gc01.sonic and where it says address type 192.168.0.1. Press OK. Press add again and click on the tap named name server and under domain name type pso-gc1.pso. Under server by type 192.168.0.2. Press OK. Again Press OK.
Click on save.
Click on the Red Hat and hover your mouse over System Settings and then click on network. Highlight your NIC and press edit.
Make sure that the IP address is 192.168.0.2 and that the subnet mask is 255.255.255.0. Press ok. Click file then click save. Press ok on the warning and close the configuration software. Press the key combination ctrl-alt-F1. Type root and then the root password. Type service network restart. Start up a windows machine with linux still up on another PC. Make sure that that PC has its IP address set to 192.168.0.1 and its subnet mask is set to 255.255.255.0. This can be found on Windows 98 in control pannel under the title network. Click on the protocol TCP/IP to change it. Run the config ship program with the following values: IP 192.168.0.1 and server name LAN. Run the server software.
If you don't have extra computers then you can use wine to emulate windows functions and run the server software. If you don't have wine installed, install it. You can download it at this site. If you installed wine change all previous IP addresses of 192.168.0.1 to 192.168.0.2 that you made in the previous setup of your DNS server.
The Fun part.
Startup Phantasy Star Online if you turned the gamecube off and press the A button on online. Select your character and wait for it to load. Please note that it will not necesarly work correctly each time you log into the server. You will know that it has frozen, if on Phantasy Star Online's movable star no longer moves. If this happens then you only need to restart the Gamecube and nothing bad has happened to it. Also, if you are in the game and you go the quest desk the game may stop responding correctly. Just click shutdown server on the LAN server software on your computer to end the session to restart it without loosing data. Also do not go to the lobby because a simular thing will occure. Please also note that not all features work like they do in a real online game. For example there is no talking supported.
I suggest that you use the real server if you want these features enabled.
PS. I know that I can't spell.
Now that I have done this what is it really doing?(In plain english)
Basically this all works through programing oversights and glitches(Nothing fancy). Your gamecube attempts to cannect to Sega's servers. As it does this, it connects to a DNS server to discover the address to Sega's servers. The DNS server that you set up tells your Gamecube to connect to your computer. Now, thats nice and all, how does my computer act like Sega's servers? This is accomplished through a glitch in the programing of Phantasy Star Online and a glitch in the LAN server software. First PSO has a glitch in it, by either an oversight or a way for Sega to add patches to the game, that it will run code sent to it by the server (either yours or the offical one), just whichever one it thinks it is susposed to connect to. In our example your DNS told it to connect to your computer. The PSO LAN server also has a glitch in it's programing. This program was designed in version 1 to only work with the computer version but by an oversight by its programer it accepts connections from the Gamecube also. This was later prevented by a patch created by its programer to disable the feature untill the offical servers close down. Get on with it all ready. That is it, really, the LAN server does its job and lets you play and you enjoy(or so I hope). Did I oversimplify my explination? Maby, but I hope that you get a basic idea of how it works anyway...
Links
Index
My new program DreamBurn to simplifly auto booting dreamcast disk burning
DVD Dump
Windows is a regestered trademark of the Microsoft Courpoation.
Linux is the property of Linus Trovoldus.
Phantasy Star Online is the property of SEGA.